Friday, December 30, 2011

Ralph Lauren paints

We love metallic paints
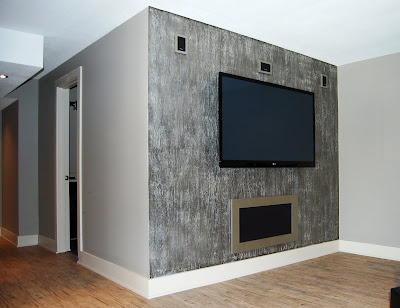
Some are easier then others to apply. This project required a special roller to apply the Ralph Lauren paint. When applying metallic paint be sure to use a fine fabric heavy nap roller. Always roll your metallic paints in the same direction. Never changing the position of the roller. For example, if your handle is faced to the right, always roll with the roller cage to the right.
Notice in the image below there are no hard lap lines
After the base coat was applied I troweled on a heavy pearlized acrylic textured medium. Then stained and glazed it, which creates depth.
This is another example of a beautiful finish using the same Ralph Lauren paint color but with a different treatment. Below we used a plaster compound to give the walls considerable texture.
I then glazed the walls, which causes the texture to pop-out.
This dining room was commissioned by a well known regional builder and was featured in the Kansas City Homes Tour.
You can see more of our work at:


Tuesday, December 27, 2011

How to paint French Provencial Furniture


So I'm flipping through some pages of the June 2011 Architectural Digest Open House addition and saw this priceless corner cabinet ...... and I wanted it! BAD!!
Yep, wrap it up and ship it to my house asap, also I'll take an oompa loompa, a live in helper and mama needs a pony...
Ok back to reality!!!
What's a girl to do?.......
Oh Honey!!!!!
I showed it to my Husband/Artist/Chef/love of my life and Faux finisher,
He fell in love with it as much as I did.
Alright then, I gave him his mission which he gladly accepted
Your mission Mitch ... If you choose to accept it.......
We found this beaut on craigslist
Its solid, nice curves, it's french provincial and in great condition
Let the Games begin!
He Striped it down, cleaned it, sanded it, and primed
b.t.w. who needs a formal dining room when you can have your very own indoors warm paint studio which you can paint to the wee hours of the night
I'm going to miss it when the tile is installed.
We used faux effects Kettle glow which is a metallic charcoal color.
Drawers and side panels were painted in faux effects metallic Pewter Gold
(My Fav)
Which was aged and glazed with Vandyke Brown
Then detailed and pinstriped the drawers with metal glow Toasted Coconut
It's starting to take on a personality now
It's ALIVE!!!!
We chose a beautiful french scene and adhered it to the panels.
We sealed the front surface and a used a clear 2 part crackle to give it depth and texture.
Then lightly glazed it to give it that antiqued
"I've been around since the 18 th century" look


MISSION ACCOMPLISHED!!!
It takes my breath away beautiful! This piece for me really shows a persons creativity and most important... Love,...  Thank you Honey.
Are you ready for you next mission ... Honey!!!??


Wednesday, December 21, 2011

Fireplace re-do with Faux tumbled tile

There she is!!!
The eye sore in our living room. We painted the fireplace in a beautiful metallic finish then softened it up with a walnut stain but now the tile doesn't go.
OK..... I'll just rip out the existing tile a replace it with a tumbled marble tile ..... pretty right?
Yeah pretty expensive!

This is my inspiration so..... It's time to raid the paint vault!

Step 1. Clean the tile with a tsp
Step deux. Sand with 150 grit sandpaper
Step 3. Clean tile with tsp
Step 4. Prime tile with Styx water base adhesion primer (good stuff)
I filled the existing grout lines with a high end synthetic venetian plaster
A good tip I learned the hard way is make sure your tile is room temperature if it's too cold the venetian plaster will droop and sag.
Ughhh... Those are the worst words a lady can hear.
I then rolled a "scratch coat" layer of plaster over the entire surface and re-filled my grout lines because the plaster shrinks as it dries.
Patience young grasshopper ... we will let dry and finish in the morning
Having no concept of time I pull my Husband into my timeless world....
Wake up Mitch and wash my brushes PLEASE!!!...
that's 12:03 am
And like a good Husband .... he does it
I think his eyes are still closed
I purchased a mosaic tile stencil online for 11 bucks!
I then applied a thin layer of plaster with a Japan scraper
I use a level and measure as I go
Here is a close up of my faux tumbled stone mosaic tile
I sanded the finished product with a sanding block to get excess plaster off and smoothed out.
And here is the finished look!
This project was very inexpensive but looks like a million


Thursday, November 24, 2011

New Faux Finishes for 2012

We are very excited about these new looks.
These are unique textured treatments utilizing new italian rollers with contemporary combinations of color and stencils.
Sometimes pictures do no justice, these rich colors and textures are breathtakingly gorgeous! We can't wait to show you before and after pictures of upcoming projects.
This new croc roller is going to be a hot look which can be customed in any color

A pair of French elegant chairs with a kick

Don't you hate it when you have the vision of a piece of furniture but can't find it anywhere? It just must not exist !! Let me introduce you to the vision that was keeping me up at night...


We were looking for a set of contemporary french provincial chairs but could only find them with traditional fabrics like the one you see below.
BORING..........
OK so we purchased them!
Now let the makeover begin....
We stripped them and of their boring dress and painted them a metallic silver.
Is it cold in here?
We found this amazing croc embossed silver and chocolate
brown metallic vinyl fabric
Love....
A helpful tip....When removing existing fabric on your project always save your original fabric. This is beneficial for tracing your pattern for reupholstering your furniture. It eliminates guess work.


Here is my vision brought to life.
We added over 400 silver studs for that special bling.
Baby got back!!
I love our new dining chairs!!!

Thursday, July 7, 2011

French Provincial Furniture

French Provincial Makeover
Have you ever seen something average and knew it could be better. Well, when I saw this desk, I saw more then just a plain , white average desk.
Who wants to be average anyways?
We started by cleaning and prepping. Starting with a clean surface insures a long lasting durable finish. We sprayed the entire desk black as well as the inside and outside of the drawers. This gives it a more professional look. After which we top coated it with a high-sheen water based poly-acrylic. Then we used a bronze metallic paint and cut it with a cream glaze medium which was brushed on and then wiped off with fine cheese cloth.
And Wallah!!!!
Ladies.... You know when you go to the beauty counter and ask for the
"Smokey eye" look??? We've all tried it at some time and come home looking like raccoons.
Well, Here is my rendition of the " smokey look" It's sultry, mysterious, it's sexy!


Sunday, June 12, 2011

New Looks In Cabinetry

What is the difference between old and new old?
This is the difference!
Great way to keep your old cabinets
current with some fast and affordable treatments
Take a look at our website at: www.kcfauxdesign.com for more ideas as well as before a after images of fun projects we have completed
This is a great way to update your old oak cabinets. With the right HPLV sprayer you can make your old oak cabinets look amazing
Glazing can be fun and a great way to change the look of your cabinets with having to break the bank
.
The base coat is sage green with a dark brown glaze

Tifanny Blue room with Trellis Stencil

BEHOLD! The POWER of PAINT!!! Before     This boring room is getting a makeover               Before                    ...